Spring MVC 4 and Simple Ajax Call

To understand this tutorial, I assume that you are already aware with Spring MVC and how it works. I will demonstrate here a simple Ajax call in Spring MVC where form data are posted and sent to the controller. The output of the ajax call is plain string text.

Step 1: Create Form

Step 2: Add Ajax Script

Step 3: Create Spring MVC Controller

Step 4: Create Model

Step 1 & 2 : Create Form & Add Ajax Script
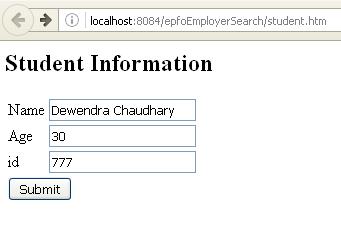
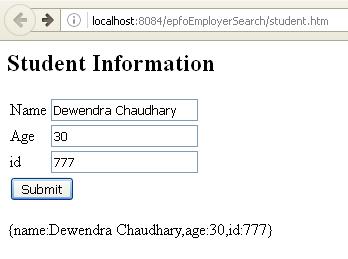
Screenshots:

Screen 1: Loading the form and filling information

1_springmvc_ajax

Screen 2: Displaying data after clicking on submit

2_springmvc_ajax

Create a jsp file with name studentForm.jsp and add the following code:

<%@taglib uri=”http://www.springframework.org/tags/form” prefix=”form”%>
<html>
<head>
<title>Spring MVC Form Handling</title>
</head>
<body>

<h2>Student Information</h2>
<form:form id=”form” method=”POST” action=”addStudent.htm” >
<table>
<tr>
<td><form:label path=”name”>Name</form:label></td>
<td><form:input path=”name” /></td>
</tr>
<tr>
<td><form:label path=”age”>Age</form:label></td>
<td><form:input path=”age” /></td>
</tr>
<tr>
<td><form:label path=”id”>id</form:label></td>
<td><form:input path=”id” /></td>
</tr>
<tr>
<td colspan=”2″>
<input type=”submit” value=”Submit” id=”submitButton” />
</td>
</tr>
</table>
</form:form>

<div id=”result”>
</div>

<script src=”https://ajax.googleapis.com/ajax/libs/jquery/1.12.4/jquery.min.js”> </script>
<script>
$(function(){

$(“#form”).submit(function(){

formData = $(“#form”).serialize();
alert(formData);
$.ajax({
type: “POST”,
url: “addStudent.htm”,
data : formData,
success : function(callback){
alert(callback);
$(“#result”).html(callback);
},
error : function(){
$(“#result”).html(“Error!”);
}
});

return false;
});
});
</script>

</body>
</html>


Step 3: Create Spring Controller

Create a java file with name studentController.java and add the following code:
package com.StudentController;
import org.springframework.stereotype.Controller;
import org.springframework.ui.ModelMap;
import org.springframework.web.bind.annotation.ModelAttribute;
import org.springframework.web.bind.annotation.RequestMapping;
import org.springframework.web.bind.annotation.RequestMethod;
import org.springframework.web.bind.annotation.ResponseBody;
import org.springframework.web.servlet.ModelAndView;
//import org.springframework.web.portlet.ModelAndView;
@Controller
public class StudentController {
@RequestMapping(value = “/student”, method = RequestMethod.GET)
public ModelAndView student() {
return new ModelAndView(“studentForm”, “command”, new Student());
}

@RequestMapping(value = “/addStudent”, method = RequestMethod.POST)
public @ResponseBody String addStudent(@ModelAttribute(“SpringWeb”)Student student) {

String studentStr = “{name:”+student.getName()+”,age:”+student.getAge()+”,id:”+student.getId()+”}”;

return studentStr;
}

}


The first method in the controller loads the form and the later one is executed when the submit button is clicked.

Step 4: Create Model

In this step data binding takes place which helps to bind the form data and transact via the controller. You must have already done this step while implementing spring custom controller. Create file Student.java and paste the following code:
package com.StudentController;

public class Student {
private Integer age;
private String name;
private Integer id;

public void setAge(Integer age) {
this.age = age;
}
public Integer getAge() {
return age;
}

public void setName(String name) {
this.name = name;
}
public String getName() {
return name;
}

public void setId(Integer id) {
this.id = id;
}
public Integer getId() {
return id;
}
}

Finally, run the project and call the student form by typing localhost:8080/project_name/student at the address bar of your browser. Fill some data into the form fields and there your are.


How to implement Heatmap on Websites using PHP, MySQL, jQuery and Ajax?

I was assigned a task when an Interviewer interviewed me and that was a Technical question. I was asked to design a system that can gather click data from a webpage and show it later in form of a Heatmap.

[dfads params=’groups=-1′]

This system can be integrated into any website which records visitor clicks on the page. The goal of of this will be to track visitor’s mouse clicks on various elements of the page and later show them accurately in form a Heatmap. The owner should be able to see aggregated click data in form of an overlay on top of his webpage. The areas in the heatmap that are red more clicks compared to the areas that are white.

After googling through the internet I found some resources which were very interesting. I devoted some time and tried to implement a demo. Please follow the following Steps:

1. Client Code : Create a file index.php and include the following code below. This is the page where users make clicks.

[code]
<script type=’text/javascript’ src="js/jquery-lib.js"></script> <!– jQuery library –>
<script type=’text/javascript’ src="js/hm-dev.js"></script> <!– Log JS –>

<title>99-Websites.com Labs</title>
<body>
<div style="text-align:center">
<img src="99-ws-labs.jpg" />
</div>
</body>

[/code]

2. The Ajax Call : Create a JS file named as hm-dev.js. This file is included in the above index.php page. Add the snippet below:

[code]
/*
Author : Dev
Date : 12/06/2015
*/

jQuery(document).ready(function() {
jQuery(document).click(function(e){
//alert(window.location.href.toString().split(window.location.host)[1]+" — "+e.pageX+" — "+e.pageY);
log_click(window.location.href.toString(), e.pageX, e.pageY);
});
var canvas = document.getElementsByTagName(‘canvas’)[0];
canvas.style.display = "none";
});

function log_click(page, x, y){ // log clicks for heatmap
jQuery.ajax({
type: ‘POST’,
url: ‘log_click.php’,
crossDomain: true,
data: "x_coord="+x+"&y_coord="+y+"&page="+page,
dataType: ‘json’,
success: function(responseData, textStatus, jqXHR)
{
if (responseData== 1){
console.log("Click logged: " + x + ", " + y);

}
else{
console.log("Error – click not logged " + x + ", " + y);
}
},
error: function (responseData, textStatus, errorThrown)
{
console.warn(responseData, textStatus, errorThrown);
alert(‘CORS failed – ‘ + textStatus);
}
});
}
[/code]

3. Log the Clicks : Create a PHP file named with log_click.php and add the following snippet.

[code]

<?php
header(‘Access-Control-Allow-Origin: *’);
header(‘Access-Control-Allow-Methods: POST, GET, OPTIONS’);
header(‘Access-Control-Max-Age: 1000’);
header(‘Access-Control-Allow-Headers: Content-Type’);

//echo json_encode(array("your_request_was" => $_POST[‘page’].$_POST[‘x_coord’].$_POST[‘y_coord’]));

include(‘config.php’); //Create config.php file and define $dbuser, $dbpass & $dbname

if(isset($_POST[‘x_coord’])){
$page = htmlentities($_POST[‘page’]);
if($page == "/"){ $page = "/index.php"; }
$xcoord = htmlentities($_POST[‘x_coord’]);
$ycoord = htmlentities($_POST[‘y_coord’]);
$time = date( ‘Y-m-d H:i:s’);

$conn = mysql_connect(‘localhost’, $dbuser, $dbpass);
mysql_select_db($dbname, $conn);
$page = mysql_real_escape_string($page);
$xcoord = mysql_real_escape_string($xcoord);
$ycoord = mysql_real_escape_string($ycoord);

mysql_query("INSERT INTO clicks (timestamp, page, x, y) VALUES (‘$time’, ‘$page’, $xcoord, $ycoord)");
mysql_close($conn);
echo "1";
}
else
{
echo ‘0’;
}

?>

[/code]

4. Create MySQL Table : Create table with following fields:

[code]

CREATE TABLE IF NOT EXISTS `clicks` (
`timestamp` datetime NOT NULL,
`page` varchar(200) NOT NULL,
`x` int(255) NOT NULL,
`y` int(255) NOT NULL
) ENGINE=InnoDB DEFAULT CHARSET=latin1;

[/code]

That’s it, the first part is over. After implementing the above steps you will be able to log clicks on the MySQL Table. The next and the main part is viewing the heat maps.

5. Create the Admin Page : Create PHP page named with admin.php. This page will lists out all the domains on which the client side code is added. When the links are clicked, their respective heatmaps will be displayed below the same page.  Admin Code is listed below:

[code]

<?php
/*
Author : Dev
Date : 12/06/2015
*/
include("config.php");
$con2 = mysql_connect(‘localhost’, $dbuser, $dbpass);
mysql_select_db($dbname, $con2);
$query = "SELECT distinct page FROM `clicks` WHERE 1";
$result = mysql_query($query);
?>
<html>
<head>
<title>Heatmap Admin</title>
<script type=’text/javascript’ src="js/jquery-lib.js"></script>

<script type=’text/javascript’ src="js/heatmap.js"></script>
<script>
jQuery(document).ready(function(){
var heatmapInstance = h337.create({
container: document.querySelector(‘.display’),
radius: 25
});

jQuery(".showcanvas").click(function(){
//location.reload();
//alert(jQuery(this).attr(‘value’));
var timescale = "day";
var page = jQuery(this).attr(‘value’);
//alert(page);
var postData = "timescale="+timescale+"&page="+page;
jQuery.ajax({
type:"POST",
dataType: "json",
data: postData,
beforeSend: function(x) {
if(x && x.overrideMimeType) {
x.overrideMimeType("application/json;charset=UTF-8");
}
}, url: ‘heatmap.php’,
success: function(data) {

if (data.amount > 0){
for (i=0; i<data.amount; i++){
heatmapInstance.addData({
x: data[i].x,
y: data[i].y,
value: 2
});
}
}
}
});

});
});
</script>
</head>
<body >
<div style="width:100%; border:1px solid; black;">
[Click on the Websites below to View their respective HeatMaps]<br>
<ul style="font-size:12px;">
<?php
while($row = mysql_fetch_assoc($result)){
?>
<li><a href="#" class="showcanvas" value="<?=$row["page"]?>"> <?=$row["page"]?></a></li> <br/>

<?php

}
?>
</ul>
</div>
<div class="display" style="width:100%;height:100%;border:1px solid; black;float:right;">
</div>

</body>
</html>

[/code]

The main logic behind the code is the heatmap.js library. In order to understand in detail you can explore the following references:

1. http://www.patrick-wied.at/static/heatmapjs/example-click-heatmap.html

2. http://rossmarks.co.uk/blog/?p=683

3. http://www.d-mueller.de/blog/cross-domain-ajax-guide/

You can view the Demo here: 

1. Client / Users Page : http://99labs.net where you can make some clicks on the webpage.

2. Admin Page : http://dewendra.com.np/labs/hm/admin.php where you can view the Heatmap.

Also, You can download the whole code from here : Download

[dfads params=’groups=-1′]

PS : The client code can be installed into any website and their logs can be maintained on the remote server. If you go through the client side code you can see the ajax code implemented with CORS (Cross Origing Resource Sharing) using jQuery.