To understand this tutorial, I assume that you are already aware with Spring MVC and how it works. I will demonstrate here a simple Ajax call in Spring MVC where form data are posted and sent to the controller. The output of the ajax call is plain string text.
Step 1: Create Form
Step 2: Add Ajax Script
Step 3: Create Spring MVC Controller
Step 4: Create Model
Step 1 & 2 : Create Form & Add Ajax Script
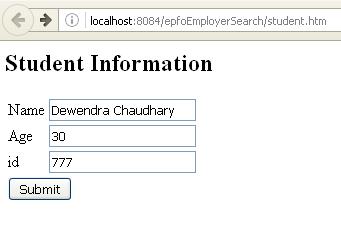
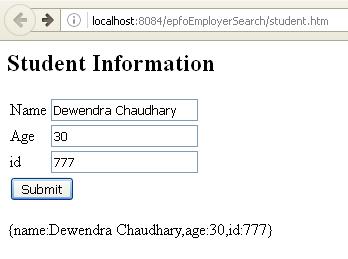
Screenshots:
Screen 1: Loading the form and filling information

Screen 2: Displaying data after clicking on submit

Create a jsp file with name studentForm.jsp and add the following code:
<%@taglib uri=”http://www.springframework.org/tags/form” prefix=”form”%>
<html>
<head>
<title>Spring MVC Form Handling</title>
</head>
<body>
<h2>Student Information</h2>
<form:form id=”form” method=”POST” action=”addStudent.htm” >
<table>
<tr>
<td><form:label path=”name”>Name</form:label></td>
<td><form:input path=”name” /></td>
</tr>
<tr>
<td><form:label path=”age”>Age</form:label></td>
<td><form:input path=”age” /></td>
</tr>
<tr>
<td><form:label path=”id”>id</form:label></td>
<td><form:input path=”id” /></td>
</tr>
<tr>
<td colspan=”2″>
<input type=”submit” value=”Submit” id=”submitButton” />
</td>
</tr>
</table>
</form:form>
<div id=”result”>
</div>
<script src=”https://ajax.googleapis.com/ajax/libs/jquery/1.12.4/jquery.min.js”> </script>
<script>
$(function(){
$(“#form”).submit(function(){
formData = $(“#form”).serialize();
alert(formData);
$.ajax({
type: “POST”,
url: “addStudent.htm”,
data : formData,
success : function(callback){
alert(callback);
$(“#result”).html(callback);
},
error : function(){
$(“#result”).html(“Error!”);
}
});
return false;
});
});
</script>
</body>
</html>
Step 3: Create Spring Controller
Create a java file with name studentController.java and add the following code:
package com.StudentController;
import org.springframework.stereotype.Controller;
import org.springframework.ui.ModelMap;
import org.springframework.web.bind.annotation.ModelAttribute;
import org.springframework.web.bind.annotation.RequestMapping;
import org.springframework.web.bind.annotation.RequestMethod;
import org.springframework.web.bind.annotation.ResponseBody;
import org.springframework.web.servlet.ModelAndView;
//import org.springframework.web.portlet.ModelAndView;
@Controller
public class StudentController {
@RequestMapping(value = “/student”, method = RequestMethod.GET)
public ModelAndView student() {
return new ModelAndView(“studentForm”, “command”, new Student());
}
@RequestMapping(value = “/addStudent”, method = RequestMethod.POST)
public @ResponseBody String addStudent(@ModelAttribute(“SpringWeb”)Student student) {
String studentStr = “{name:”+student.getName()+”,age:”+student.getAge()+”,id:”+student.getId()+”}”;
return studentStr;
}
}
The first method in the controller loads the form and the later one is executed when the submit button is clicked.
Step 4: Create Model
In this step data binding takes place which helps to bind the form data and transact via the controller. You must have already done this step while implementing spring custom controller. Create file Student.java and paste the following code:
package com.StudentController;
public class Student {
private Integer age;
private String name;
private Integer id;
public void setAge(Integer age) {
this.age = age;
}
public Integer getAge() {
return age;
}
public void setName(String name) {
this.name = name;
}
public String getName() {
return name;
}
public void setId(Integer id) {
this.id = id;
}
public Integer getId() {
return id;
}
}
Finally, run the project and call the student form by typing localhost:8080/project_name/student at the address bar of your browser. Fill some data into the form fields and there your are.
what is the difference between mvc4 and previous versions?
Please check this for more details:
https://www.quora.com/What-is-the-difference-between-framework-Spring-3-x-and-Spring-4-x