Spring MVC 4 and Simple Ajax Call

To understand this tutorial, I assume that you are already aware with Spring MVC and how it works. I will demonstrate here a simple Ajax call in Spring MVC where form data are posted and sent to the controller. The output of the ajax call is plain string text.

Step 1: Create Form

Step 2: Add Ajax Script

Step 3: Create Spring MVC Controller

Step 4: Create Model

Step 1 & 2 : Create Form & Add Ajax Script

Screenshots:

Screen 1: Loading the form and filling information
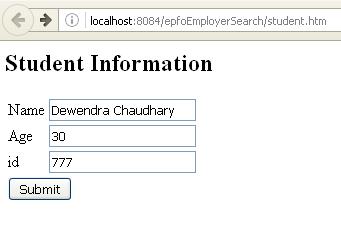
1_springmvc_ajax

Screen 2: Displaying data after clicking on submit
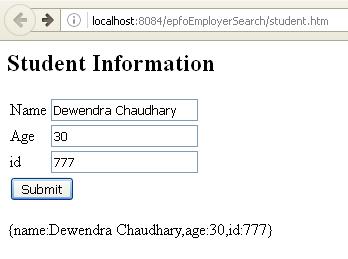
2_springmvc_ajax

Create a jsp file with name studentForm.jsp and add the following code:

<%@taglib uri=”http://www.springframework.org/tags/form” prefix=”form”%>
<html>
<head>
<title>Spring MVC Form Handling</title>
</head>
<body>

<h2>Student Information</h2>
<form:form id=”form” method=”POST” action=”addStudent.htm” >
<table>
<tr>
<td><form:label path=”name”>Name</form:label></td>
<td><form:input path=”name” /></td>
</tr>
<tr>
<td><form:label path=”age”>Age</form:label></td>
<td><form:input path=”age” /></td>
</tr>
<tr>
<td><form:label path=”id”>id</form:label></td>
<td><form:input path=”id” /></td>
</tr>
<tr>
<td colspan=”2″>
<input type=”submit” value=”Submit” id=”submitButton” />
</td>
</tr>
</table>
</form:form>

<div id=”result”>
</div>

<script src=”https://ajax.googleapis.com/ajax/libs/jquery/1.12.4/jquery.min.js”> </script>
<script>
$(function(){

$(“#form”).submit(function(){

formData = $(“#form”).serialize();
alert(formData);
$.ajax({
type: “POST”,
url: “addStudent.htm”,
data : formData,
success : function(callback){
alert(callback);
$(“#result”).html(callback);
},
error : function(){
$(“#result”).html(“Error!”);
}
});

return false;
});
});
</script>

</body>
</html>


Step 3: Create Spring Controller

Create a java file with name studentController.java and add the following code:
package com.StudentController;
import org.springframework.stereotype.Controller;
import org.springframework.ui.ModelMap;
import org.springframework.web.bind.annotation.ModelAttribute;
import org.springframework.web.bind.annotation.RequestMapping;
import org.springframework.web.bind.annotation.RequestMethod;
import org.springframework.web.bind.annotation.ResponseBody;
import org.springframework.web.servlet.ModelAndView;
//import org.springframework.web.portlet.ModelAndView;
@Controller
public class StudentController {
@RequestMapping(value = “/student”, method = RequestMethod.GET)
public ModelAndView student() {
return new ModelAndView(“studentForm”, “command”, new Student());
}

@RequestMapping(value = “/addStudent”, method = RequestMethod.POST)
public @ResponseBody String addStudent(@ModelAttribute(“SpringWeb”)Student student) {

String studentStr = “{name:”+student.getName()+”,age:”+student.getAge()+”,id:”+student.getId()+”}”;

return studentStr;
}

}


The first method in the controller loads the form and the later one is executed when the submit button is clicked.

Step 4: Create Model

In this step data binding takes place which helps to bind the form data and transact via the controller. You must have already done this step while implementing spring custom controller. Create file Student.java and paste the following code:
package com.StudentController;

public class Student {
private Integer age;
private String name;
private Integer id;

public void setAge(Integer age) {
this.age = age;
}
public Integer getAge() {
return age;
}

public void setName(String name) {
this.name = name;
}
public String getName() {
return name;
}

public void setId(Integer id) {
this.id = id;
}
public Integer getId() {
return id;
}
}

Finally, run the project and call the student form by typing localhost:8080/project_name/student at the address bar of your browser. Fill some data into the form fields and there your are.


The concept of blog will never die, perhaps it has increasing rate of scope in upcoming future.

It is found that there is a rampage increase in the rate to write personal blogs where people are interacting with each other via the digital networks. In 2012, blogging.org stated that there were more than 42 million blog users in wordpress.org and 46 million users in blogger.com. These numbers will be reaching the sky limit in upcoming future.

blog

It has been already proved that people are interacting with each other via the virtual media and the number is continuously decreasing who interact physically. The online social media platforms such as facebook, twitter, instagram, etc. has taken all the time of citizens in every country. People sit online for hours to update their statuses, upload images, share tweets, write thoughts, etc. on their hand held devices or on their computers. This is why people are writing more and more than they speak in the public which is converting the social media platforms into micro and medium blogging sites.

Believe me or not, in my opinion, the upcoming generation will communicate with each other using texts and words & people will log their ideas, discussions, arguments, thoughts, etc. on the cloud using technology web based applications. Today they are sharing their thoughts on fb, twitter, quora, instagram, etc. Tomorrow they will owe their personal domain names to represent themselves. In Nepal and various other countries, the citizens avail their domain names free of cost. You can request your name from register.mos.com.np, an authorized institute in Kathmandu if you belong to Nepal. You just require a scan copy of a valid citizenship card if you want to register domain name for individual and a scan copy of company registration certificate for an organisation/company.

Reference:

Blogging Statistics, Facts and Figures in 2012 – Infographic

http://www.social4retail.com/the-blog-economy-blogging-stats-infographic-2014.html

How to implement Heatmap on Websites using PHP, MySQL, jQuery and Ajax?

I was assigned a task when an Interviewer interviewed me and that was a Technical question. I was asked to design a system that can gather click data from a webpage and show it later in form of a Heatmap.

[dfads params=’groups=-1′]

This system can be integrated into any website which records visitor clicks on the page. The goal of of this will be to track visitor’s mouse clicks on various elements of the page and later show them accurately in form a Heatmap. The owner should be able to see aggregated click data in form of an overlay on top of his webpage. The areas in the heatmap that are red more clicks compared to the areas that are white.

After googling through the internet I found some resources which were very interesting. I devoted some time and tried to implement a demo. Please follow the following Steps:

1. Client Code : Create a file index.php and include the following code below. This is the page where users make clicks.

[code]
<script type=’text/javascript’ src="js/jquery-lib.js"></script> <!– jQuery library –>
<script type=’text/javascript’ src="js/hm-dev.js"></script> <!– Log JS –>

<title>99-Websites.com Labs</title>
<body>
<div style="text-align:center">
<img src="99-ws-labs.jpg" />
</div>
</body>

[/code]

2. The Ajax Call : Create a JS file named as hm-dev.js. This file is included in the above index.php page. Add the snippet below:

[code]
/*
Author : Dev
Date : 12/06/2015
*/

jQuery(document).ready(function() {
jQuery(document).click(function(e){
//alert(window.location.href.toString().split(window.location.host)[1]+" — "+e.pageX+" — "+e.pageY);
log_click(window.location.href.toString(), e.pageX, e.pageY);
});
var canvas = document.getElementsByTagName(‘canvas’)[0];
canvas.style.display = "none";
});

function log_click(page, x, y){ // log clicks for heatmap
jQuery.ajax({
type: ‘POST’,
url: ‘log_click.php’,
crossDomain: true,
data: "x_coord="+x+"&y_coord="+y+"&page="+page,
dataType: ‘json’,
success: function(responseData, textStatus, jqXHR)
{
if (responseData== 1){
console.log("Click logged: " + x + ", " + y);

}
else{
console.log("Error – click not logged " + x + ", " + y);
}
},
error: function (responseData, textStatus, errorThrown)
{
console.warn(responseData, textStatus, errorThrown);
alert(‘CORS failed – ‘ + textStatus);
}
});
}
[/code]

3. Log the Clicks : Create a PHP file named with log_click.php and add the following snippet.

[code]

<?php
header(‘Access-Control-Allow-Origin: *’);
header(‘Access-Control-Allow-Methods: POST, GET, OPTIONS’);
header(‘Access-Control-Max-Age: 1000’);
header(‘Access-Control-Allow-Headers: Content-Type’);

//echo json_encode(array("your_request_was" => $_POST[‘page’].$_POST[‘x_coord’].$_POST[‘y_coord’]));

include(‘config.php’); //Create config.php file and define $dbuser, $dbpass & $dbname

if(isset($_POST[‘x_coord’])){
$page = htmlentities($_POST[‘page’]);
if($page == "/"){ $page = "/index.php"; }
$xcoord = htmlentities($_POST[‘x_coord’]);
$ycoord = htmlentities($_POST[‘y_coord’]);
$time = date( ‘Y-m-d H:i:s’);

$conn = mysql_connect(‘localhost’, $dbuser, $dbpass);
mysql_select_db($dbname, $conn);
$page = mysql_real_escape_string($page);
$xcoord = mysql_real_escape_string($xcoord);
$ycoord = mysql_real_escape_string($ycoord);

mysql_query("INSERT INTO clicks (timestamp, page, x, y) VALUES (‘$time’, ‘$page’, $xcoord, $ycoord)");
mysql_close($conn);
echo "1";
}
else
{
echo ‘0’;
}

?>

[/code]

4. Create MySQL Table : Create table with following fields:

[code]

CREATE TABLE IF NOT EXISTS `clicks` (
`timestamp` datetime NOT NULL,
`page` varchar(200) NOT NULL,
`x` int(255) NOT NULL,
`y` int(255) NOT NULL
) ENGINE=InnoDB DEFAULT CHARSET=latin1;

[/code]

That’s it, the first part is over. After implementing the above steps you will be able to log clicks on the MySQL Table. The next and the main part is viewing the heat maps.

5. Create the Admin Page : Create PHP page named with admin.php. This page will lists out all the domains on which the client side code is added. When the links are clicked, their respective heatmaps will be displayed below the same page.  Admin Code is listed below:

[code]

<?php
/*
Author : Dev
Date : 12/06/2015
*/
include("config.php");
$con2 = mysql_connect(‘localhost’, $dbuser, $dbpass);
mysql_select_db($dbname, $con2);
$query = "SELECT distinct page FROM `clicks` WHERE 1";
$result = mysql_query($query);
?>
<html>
<head>
<title>Heatmap Admin</title>
<script type=’text/javascript’ src="js/jquery-lib.js"></script>

<script type=’text/javascript’ src="js/heatmap.js"></script>
<script>
jQuery(document).ready(function(){
var heatmapInstance = h337.create({
container: document.querySelector(‘.display’),
radius: 25
});

jQuery(".showcanvas").click(function(){
//location.reload();
//alert(jQuery(this).attr(‘value’));
var timescale = "day";
var page = jQuery(this).attr(‘value’);
//alert(page);
var postData = "timescale="+timescale+"&page="+page;
jQuery.ajax({
type:"POST",
dataType: "json",
data: postData,
beforeSend: function(x) {
if(x && x.overrideMimeType) {
x.overrideMimeType("application/json;charset=UTF-8");
}
}, url: ‘heatmap.php’,
success: function(data) {

if (data.amount > 0){
for (i=0; i<data.amount; i++){
heatmapInstance.addData({
x: data[i].x,
y: data[i].y,
value: 2
});
}
}
}
});

});
});
</script>
</head>
<body >
<div style="width:100%; border:1px solid; black;">
[Click on the Websites below to View their respective HeatMaps]<br>
<ul style="font-size:12px;">
<?php
while($row = mysql_fetch_assoc($result)){
?>
<li><a href="#" class="showcanvas" value="<?=$row["page"]?>"> <?=$row["page"]?></a></li> <br/>

<?php

}
?>
</ul>
</div>
<div class="display" style="width:100%;height:100%;border:1px solid; black;float:right;">
</div>

</body>
</html>

[/code]

The main logic behind the code is the heatmap.js library. In order to understand in detail you can explore the following references:

1. http://www.patrick-wied.at/static/heatmapjs/example-click-heatmap.html

2. http://rossmarks.co.uk/blog/?p=683

3. http://www.d-mueller.de/blog/cross-domain-ajax-guide/

You can view the Demo here: 

1. Client / Users Page : http://99labs.net where you can make some clicks on the webpage.

2. Admin Page : http://dewendra.com.np/labs/hm/admin.php where you can view the Heatmap.

Also, You can download the whole code from here : Download

[dfads params=’groups=-1′]

PS : The client code can be installed into any website and their logs can be maintained on the remote server. If you go through the client side code you can see the ajax code implemented with CORS (Cross Origing Resource Sharing) using jQuery.

How do I use Java with the Google Chrome browser?


NPAPI support by Chrome

The Java plug-in for web browsers relies on the cross platform plugin architecture NPAPI, which has long been, and currently is, supported by all major web browsers. Google announced in September 2013 plans to remove NPAPI support from Chrome by “the end of 2014”, thus effectively dropping support for Silverlight, Java, Facebook Video and other similar NPAPI based plugins.

[dfads params=’groups=-1′]


 Enabling NPAPI in Chrome Version 42 and later

As of Chrome Version 42, an additional configuration step is required to continue using NPAPI plugins.

  1. In your URL bar, enter:
    chrome://flags/#enable-npapi
  2. Click the Enable link for the Enable NPAPI configuration option.
  3. Click the Relaunch button that now appears at the bottom of the configuration page.

Java plug-in needs permission


If you see a message within Chrome that says Java(TM) needs your permission to run, you will need to respond to the Chrome options in order to run plug-ins on the page. Options vary according to the version of Chrome.

Chrome plug-in blocked icon (in address bar)

Look for the blocked plug-in icon in the Chrome address bar. Clicking on the icon will display Plug-ins were blocked on this page and plug-in options

  • Click Always allow plug-ins on [name of site] to allow plug-ins (including Java) to run on all this site’s pages.
  • Click Run all plug-ins this time to allow the plug-in (including Java) content on the page to run only until you leave this page.
  • Click Continue blocking plug-ins to prevent plug-ins from running on the page.

In addition, you can manage permissions on a site basis through the Manage plug-in blocking option.

Chrome message bar

  • Click Run this time to allow the Java content on the page to run only until you leave this page.
  • Click Always run on this site to allow Java to run on all this site’s pages. You will not see this message again for pages on this site.

Additional plug-in required

If you see a message bar within Chrome that says Java(TM) is required to display some elements on this page, click on Install plug-in in the Chrome message bar, or download from java.com.

[dfads params=’groups=-1′]

Plug-in out of date

If you see a message bar within Chrome that says Java(TM) was blocked because it is out of date, click on Update plug-in in the Chrome message bar to get the latest Java.

Reference:

https://java.com/en/download/faq/chrome.xml

Alternatives to NPAPI plugin

After upgrading the earlier versions of Chromium browsers to later versions greater than 42, internet users have started complaints that the JAVA plugins are not supported by chrome. After a bit research, found that chromium browsers have disabled NPAPI plugin-in on their latest versions. The deprecation of NPAPI plug-in caused the JAVA plugins to be blocked in Chrome. 

[dfads params=’groups=-1′]

What is NPAPI plug-in? (Source: Wiki)

Netscape Plugin Application Programming Interface (NPAPI) is a cross-platform plugin architecture used by many web browsers.

It was first developed for Netscape browsers, starting in 1995 with Netscape Navigator 2.0, but was subsequently adopted in Internet Explorer 3 in 1996 and implemented by many other browsers, although some browsers later dropped support.

For stability and security reasons, Google Chrome decided, in 2013, to start phasing out support for NPAPI. As of Chrome version 42, NPAPI is disabled by default and must be re-enabled explicitly. Google intends to remove support entirely in version 45, due in September 2015. 

Alternatives to NPAPI (Source: chromium.org)

With the deprecation of NPAPI, some developers have asked which modern technologies can be used to implement features which in the past would have relied on a platform-specific NPAPI plug-in. In answer to these questions we have composed the following list of common NPAPI use cases and web platform alternatives.

In general, the core standards-based web technologies (HTML/CSS/JS) are suitable for most client software development. If your application requires access to features outside the web sandbox, myriad Chrome Extension and App APIs offer access to OS features.

Video and audio

A common use case for NPAPI plug-ins on the modern web is embedded video and/or audio. A range of modern web technologies exist to facilitate media streaming.  The basic building blocks are WebRTC and media elements:

HTML5 Media Elements:  The HTML5 Specification provides a rich media platform through the <audio> and <video> elements. More complicated use cases can be achieved using the <canvas> element (for example check out the Video FX Chrome Experiment).

WebRTC:  WebRTC was designed for real time communication between peers and the technology can also be used for applications like live streaming media and data. Google’s Chromecast device uses WebRTC to stream HD video between a browser and TV.

Several features on top of these building blocks support more advanced use cases:

Adaptive Streaming

The ability to adapt media streaming to an individual consumer is critical in delivering high-quality content to a large audience. In the past this capability has been provided by technologies such as Silverlight’s smooth streaming and Quicktime’s HTTP live streaming. The Media Source Extensions to the HTML media element provide the capability to adapt a stream to an individual consumer on the modern web. Html5rocks has put together a great example of how to use the Media Source Extensions to implement some of these common use cases.

Video Conferencing

Several of the most popular NPAPI extensions including Facebook Video Chat and Google Talk provide video conferencing functionality within the browser. With the introduction of WebRTC video conferencing is facilitated directly through JavaScript APIs. The Cube Slam Chrome Experiment provides an example of peer to peer video conferencing via WebRTC.

Digital Rights Management

Encrypted Media Extensions give HTML5 video the DRM capabilities that previously would have required the use of a platform specific plug-in. The WebM project has provided a demo which performs video playback using the Encrypted Media Extensions of the video element.  For more information, check out the EME HTML5 Rocks article.

Closed Captioning

WebVTT and the <track> element (a child element of <video>) enable web developers to add timed-text captioning capabilities to their HTML apps.

Communicating with native applications

Try the Native Messaging API for Chrome Apps and Extensions.

Games & 3D

Native Client (NaCL) provides a rich environment for cross-platform game development. Many games have already been ported to or designed for NaCL. A number of examples and detailed tutorials to get started with NaCL are available on the NaCL development site. The WebGL specification provides a high-performance platform for hardware-accelerated 3D graphics in the browser. Chrome experiments has an entire category dedicated to examples and demos of various WebGL use cases.

Security

Some services have relied on NPAPI-based security techniques.  We recommend switching to TLS or, soon, Web Crypto.

Hardware access

In the past it has often been necessary to write platform specific plug-ins to access system hardware such as webcams, microphones, USB devices, and bluetooth. Direct access to local media streams such as webcams and microphones can now be requested directly from the web via the WebRTC Media Capture specification. Chromium also provides an App API for access to USB hardware and another API for accessing Bluetooth devices.

Screen capture

Chrome extensions can perform screen capture or streaming using either Desktop Capture for full screen capture or the Tabs API captureVisibleTab for individual tab content capture. 

[dfads params=’groups=-1′]

Reference:

http://www.chromium.org/developers/npapi-deprecation

http://en.wikipedia.org/wiki/NPAPI

Import large database tables from CSV files using oracle_loader driver in Oracle External Table

After trying various techniques to import csv data to oracle tables, I found this as the simplest and the fastest way to import large databases into oracle tables. This technique uses oracle_loader driver in Oracle External Table. The basic is that external table displays data by reading from a physical file.

[dfads params=’groups=-1′]

Steps:
1. Create a physical directory in one of your drive. Paste your csv data into the same directory.

2. Execute the script below on sqldeveloper.

3. Congratulations, play with your data tables.

[code]
create or replace directory my_data_app as ‘D:my_data_app’;

CREATE TABLE BULK_KYC_UPLOAD_BY_EMPLOYER_AI
( office_id number(11) ,
uan varchar2(12) ,
cur_mid varchar2(25) ,
document_type varchar2(1) ,
document_name varchar2(85) ,
document_no varchar2(25) ,
ifsc_code varchar2(11) ,
employee_name varchar2(100) ,
expiry_date varchar2(50) ,
edu_quali_flag varchar2(1) ,
phy_hand_flag varchar2(1) ,
phy_hand_cat_flag varchar2(1) ,
gender_flag varchar2(1) ,
number_worker_flag varchar2(1) ,
martial_status_flag varchar2(1) ,
establishment_id varchar2(15) ,
scan_document_flag number(11) ,
alredy_veryfied_flag number(11) ,
document_scan_image varchar2(100) ,
dob varchar2(50) ,
doj varchar2(50) ,
doe varchar2(50) ,
father_husband_name varchar2(85) ,
fs_flag varchar2(1) ,
bulk_kyc_tracking_id varchar2(15) ,
text_file_upload_date varchar2(50) ,
online_verification number(1),
ts_online_verification varchar2(50) ,
employer_verification number(1) ,
ts_employer_verification varchar2(50) ,
field_office_verification number(1),
ts_field_office_verification varchar2(50) ,
added_by varchar2(1) ,
missing_detail_source_flag varchar2(1) ,
ts varchar2(50),
duplicate_flag varchar2(2),
duplicate_ts varchar2(50)
)
ORGANIZATION EXTERNAL
(
TYPE ORACLE_LOADER
DEFAULT DIRECTORY my_data_app
ACCESS PARAMETERS
(
RECORDS DELIMITED BY NEWLINE
SKIP 1
LOGFILE my_data_app:’data.log’
BADFILE my_data_app:’data.bad’
DISCARDFILE my_data_app:’data.disc’
fields terminated by ‘,’
OPTIONALLY ENCLOSED BY ‘"’
MISSING FIELD VALUES ARE NULL
(
office_id,
uan ,
cur_mid ,
document_type ,
document_name,
document_no,
ifsc_code,
employee_name,
expiry_date,
edu_quali_flag,
phy_hand_flag,
phy_hand_cat_flag,
gender_flag,
number_worker_flag,
martial_status_flag,
establishment_id,
scan_document_flag,
alredy_veryfied_flag,
document_scan_image,
dob,
doj,
doe,
father_husband_name,
fs_flag,
bulk_kyc_tracking_id,
text_file_upload_date,
online_verification,
ts_online_verification,
employer_verification,
ts_employer_verification,
field_office_verification,
ts_field_office_verification,
added_by,
missing_detail_source_flag,
ts,
duplicate_flag,
duplicate_ts
)
)
LOCATION (my_data_app:’kyc_16012015.csv’)
)reject limit unlimited;

select * from BULK_KYC_UPLOAD_BY_EMPLOYER_AI;

select * from BULK_KYC_UPLOAD_BY_EMPLOYER_AF rownum < 200;

drop table BULK_KYC_UPLOAD_BY_EMPLOYER_AI;

insert into bulk_kyc_upload_by_employer_af select * FROM bulk_kyc_upload_by_employer_ai;
commit;
[/code]

In order to Export large database table into a dump file using oracle_datapump driver in Oracle External Table, Click Here
[dfads params=’groups=-1′]

Export large database table into a dump file using oracle_datapump driver in Oracle External Table

[dfads params=’groups=-1′]

There are various ways to export oracle database tables. Here, I was dealing with large database tables when I was working at one of the india’s biggest government company. I had to import and export crores of tuples from and to csv files.
Following is the simplest example to unload data from huge oracle database to a dump file using oracle_datapump driver in Oracle External Table.

[code]create or replace directory my_data_app as ‘D:my_data_app’;

create table bulk_kyc_xt
ORGANIZATION EXTERNAL
(
TYPE ORACLE_DATAPUMP
DEFAULT DIRECTORY my_data_app
LOCATION (‘bulk_kyc_xt.dmp’)
)
AS SELECT * FROM bulk_kyc_upload_by_employer_af;

select * from bulk_kyc_xt;

drop table bulk_kyc_xt;

[/code]

In order to import oracle table from a csv file using oracle external table, click here.

[dfads params=’groups=-1′]

Eport data to excel using Codeigniter and Oracle (OCI)

Below is a simple code snippet that will help you to export data to CSV/Excel format using Codeigniter and Oracle. Yes, it is obvious that you must have knowledge regarding Codeigniter and Oracle before you proceed further reading.

[dfads params=’groups=-1′]

The code below contains few PHP variables and function calls. I hope that you understand the same in a better way and please give your feedback if you feel this needs.

$sql = "SELECT * FROM your_table_name";
$filename = "Name_of_the_file.csv";
$countRow = functionCountRow();

$this->searchkyc_model->ExportToExcel($sql,$filename,$countRow);

public function ExportToExcel($sql,$filename,$countRow) { 	

		$output = "";

		$this->epfo_db = $this->load->database('EPFO', true);		

		$stmt = oci_parse($this->epfo_db->conn_id, $sql);

		oci_execute($stmt);

		$ncols = oci_num_fields($stmt);

		for ($i = 1; $i <= $ncols; ++$i) { 			
                    $colname = oci_field_name($stmt, $i);			 			
                    $output .= '"'.$colname.'",'; 		
                 } 		
                $output.="n"; 		 		
                $row = oci_fetch_all($stmt, $result); 		
                oci_free_statement($stmt); 		
                oci_close($this->epfo_db->conn_id);	

		// Get Records from the table
		for($i=0;$i<$countRow;$i++){ 				 				                
                    foreach($result as $key=>$val){
					$output.='"'.$val[$i].'",';
		          }
				$output.="n";
		}

		// Download the file	
		header('Content-type: application/csv');
		header('Content-Disposition: attachment; filename='.$filename);

		echo $output;
		exit;

	 }

[dfads params=’groups=-1′]

ORA-24408: could not generate unique server group name

After continuous google for more than 10 hours, I finally came to a conclusion that the problem “ORA-24408: could not generate unique server group name” was not with oracle instanclient or the connection string oci_connect(). The only problem was with the mis-match of the hostnames of the application server defined in /etc/sysconfig/network & /etc/hosts.

[dfads params=’groups=-1′]

After modifying the hostnames in both the file to a single name, the problem was solved.

 $ vi /etc/sysconfig/network

NETWORKING=yes
HOSTNAME=RHEL65
$vi /etc/hosts

$ vi /etc/hosts
#127.0.0.1   localhost localhost.localdomain localhost4 localhost4.localdomain4
127.0.0.1    RHEL65

$service network restart

The above steps helped me save my valuable time. Thanks to the bloggers.

I hope these information would help you too. Best wishes!

[dfads params=’groups=-1′]

[Source: http://ahmadzainuddinzakaria.blogspot.in/2012/06/warning-ociconnect-functionoci-connect.html]

How do I setup proxy in Red Hat Enterprise Linux to access internet?

To setup the proxy environment variable as a global variable, open /etc/profile file:

# vi /etc/profile

Add the following information:

export http_proxy=http://proxy-server.name.or.ip:3128/

OR

export http_proxy=http://USERNAME:PASSOWRD@proxy-server.mycorp.com:3128/

Save and close the file.

[dfads params=’groups=-1′]