Spring MVC 4 and Simple Ajax Call

To understand this tutorial, I assume that you are already aware with Spring MVC and how it works. I will demonstrate here a simple Ajax call in Spring MVC where form data are posted and sent to the controller. The output of the ajax call is plain string text.

Step 1: Create Form

Step 2: Add Ajax Script

Step 3: Create Spring MVC Controller

Step 4: Create Model

Step 1 & 2 : Create Form & Add Ajax Script

Screenshots:

Screen 1: Loading the form and filling information
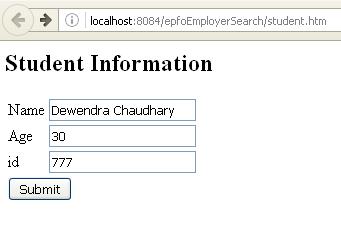
1_springmvc_ajax

Screen 2: Displaying data after clicking on submit
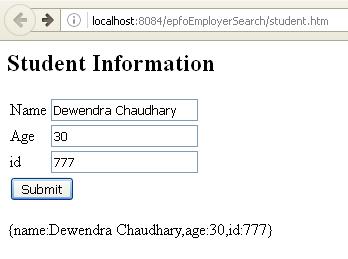
2_springmvc_ajax

Create a jsp file with name studentForm.jsp and add the following code:

<%@taglib uri=”http://www.springframework.org/tags/form” prefix=”form”%>
<html>
<head>
<title>Spring MVC Form Handling</title>
</head>
<body>

<h2>Student Information</h2>
<form:form id=”form” method=”POST” action=”addStudent.htm” >
<table>
<tr>
<td><form:label path=”name”>Name</form:label></td>
<td><form:input path=”name” /></td>
</tr>
<tr>
<td><form:label path=”age”>Age</form:label></td>
<td><form:input path=”age” /></td>
</tr>
<tr>
<td><form:label path=”id”>id</form:label></td>
<td><form:input path=”id” /></td>
</tr>
<tr>
<td colspan=”2″>
<input type=”submit” value=”Submit” id=”submitButton” />
</td>
</tr>
</table>
</form:form>

<div id=”result”>
</div>

<script src=”https://ajax.googleapis.com/ajax/libs/jquery/1.12.4/jquery.min.js”> </script>
<script>
$(function(){

$(“#form”).submit(function(){

formData = $(“#form”).serialize();
alert(formData);
$.ajax({
type: “POST”,
url: “addStudent.htm”,
data : formData,
success : function(callback){
alert(callback);
$(“#result”).html(callback);
},
error : function(){
$(“#result”).html(“Error!”);
}
});

return false;
});
});
</script>

</body>
</html>


Step 3: Create Spring Controller

Create a java file with name studentController.java and add the following code:
package com.StudentController;
import org.springframework.stereotype.Controller;
import org.springframework.ui.ModelMap;
import org.springframework.web.bind.annotation.ModelAttribute;
import org.springframework.web.bind.annotation.RequestMapping;
import org.springframework.web.bind.annotation.RequestMethod;
import org.springframework.web.bind.annotation.ResponseBody;
import org.springframework.web.servlet.ModelAndView;
//import org.springframework.web.portlet.ModelAndView;
@Controller
public class StudentController {
@RequestMapping(value = “/student”, method = RequestMethod.GET)
public ModelAndView student() {
return new ModelAndView(“studentForm”, “command”, new Student());
}

@RequestMapping(value = “/addStudent”, method = RequestMethod.POST)
public @ResponseBody String addStudent(@ModelAttribute(“SpringWeb”)Student student) {

String studentStr = “{name:”+student.getName()+”,age:”+student.getAge()+”,id:”+student.getId()+”}”;

return studentStr;
}

}


The first method in the controller loads the form and the later one is executed when the submit button is clicked.

Step 4: Create Model

In this step data binding takes place which helps to bind the form data and transact via the controller. You must have already done this step while implementing spring custom controller. Create file Student.java and paste the following code:
package com.StudentController;

public class Student {
private Integer age;
private String name;
private Integer id;

public void setAge(Integer age) {
this.age = age;
}
public Integer getAge() {
return age;
}

public void setName(String name) {
this.name = name;
}
public String getName() {
return name;
}

public void setId(Integer id) {
this.id = id;
}
public Integer getId() {
return id;
}
}

Finally, run the project and call the student form by typing localhost:8080/project_name/student at the address bar of your browser. Fill some data into the form fields and there your are.


The concept of blog will never die, perhaps it has increasing rate of scope in upcoming future.

It is found that there is a rampage increase in the rate to write personal blogs where people are interacting with each other via the digital networks. In 2012, blogging.org stated that there were more than 42 million blog users in wordpress.org and 46 million users in blogger.com. These numbers will be reaching the sky limit in upcoming future.

blog

It has been already proved that people are interacting with each other via the virtual media and the number is continuously decreasing who interact physically. The online social media platforms such as facebook, twitter, instagram, etc. has taken all the time of citizens in every country. People sit online for hours to update their statuses, upload images, share tweets, write thoughts, etc. on their hand held devices or on their computers. This is why people are writing more and more than they speak in the public which is converting the social media platforms into micro and medium blogging sites.

Believe me or not, in my opinion, the upcoming generation will communicate with each other using texts and words & people will log their ideas, discussions, arguments, thoughts, etc. on the cloud using technology web based applications. Today they are sharing their thoughts on fb, twitter, quora, instagram, etc. Tomorrow they will owe their personal domain names to represent themselves. In Nepal and various other countries, the citizens avail their domain names free of cost. You can request your name from register.mos.com.np, an authorized institute in Kathmandu if you belong to Nepal. You just require a scan copy of a valid citizenship card if you want to register domain name for individual and a scan copy of company registration certificate for an organisation/company.

Reference:

Blogging Statistics, Facts and Figures in 2012 – Infographic

http://www.social4retail.com/the-blog-economy-blogging-stats-infographic-2014.html

#SignMyTL – A Complete Microblog using PHP & MySQL (Facebook Like Timeline)

#Website:

A website is a location to the internet that maintains one or more webpages.

#Microblog: 

Microblog is a social media site to which a user makes short, frequent posts.

#SignMyTL

#SignMyTL is a digital autobiograph for one who wants to create log of the key activities of their daily life on the Web. The key feature to this application is that user can share blog post, upload images, youtube videos, facebook timline layout, share immediate comments, smiley support, infinite scroll of website.

Why #SignMyTL?
1. I want my private TimLine public.
2. I want to make a history of my life.
3. I want to connect with my friends differently.
4. I am what my friends talk about me.
5. I want to say something silently.
6. Social Networks are getting fake day by day.
7. I want to be true to myself.

How to get #SignMyTL?

Click here to download #SignMyTL
Click here to view Live Demo

How to install #SignMyTL?

1. Extract and upload SignMyTL directory using ftp client software.

Directory Structure :

SignMyTL 1.0

  • assets
    images
    javascripts
    smileys
    stylesheets
  • imagecache
  • includes
  • uploads

2. Use signmytl.sql to create database & tables.
3. Modify the database credentials in the SignMyTL/config.php.
4. Access your SignMyTL using http://your.domain.name/SignMyTL.

Install SSL Certificate – godaddy

[ Login to Godaddy Sales Account ]
1. Login to your godaddy sales account -> Go to SSL Certificates -> Click on Manage

2. Click on View Status

3. Click on download from Certificate Management Options -> Extract from the zip file (You will get two .crt files)

[ Login to Hosting cPanel ]

4. Login to your hosting cPanel -> Go to Home -> Go to SSL / TLS -> Click on Certificates (crt)

5. Browse and upload crt file (That you downloaded from the Sales, follow point 3)

6. Next you will be followed by the system.


[dfads params=’groups=-1′]

ORA-24408: could not generate unique server group name

After continuous google for more than 10 hours, I finally came to a conclusion that the problem “ORA-24408: could not generate unique server group name” was not with oracle instanclient or the connection string oci_connect(). The only problem was with the mis-match of the hostnames of the application server defined in /etc/sysconfig/network & /etc/hosts.

[dfads params=’groups=-1′]

After modifying the hostnames in both the file to a single name, the problem was solved.

 $ vi /etc/sysconfig/network

NETWORKING=yes
HOSTNAME=RHEL65
$vi /etc/hosts

$ vi /etc/hosts
#127.0.0.1   localhost localhost.localdomain localhost4 localhost4.localdomain4
127.0.0.1    RHEL65

$service network restart

The above steps helped me save my valuable time. Thanks to the bloggers.

I hope these information would help you too. Best wishes!

[dfads params=’groups=-1′]

[Source: http://ahmadzainuddinzakaria.blogspot.in/2012/06/warning-ociconnect-functionoci-connect.html]

Unable to save changes to menu in Drupal 6

[dfads params=’groups=-1′]

On the menu-customize page, after

1) dragging a menu item, or

2) checking/unchecking an enable checkbox,

and clicking “Save configuration”, changes to menu were not saved in Drupal 6. Hence, I started to debug the issue at the Application level. After long head bang, I raised my hand and took some rest. Finally, I googled and found that the problem was not at the Application Level but at System Level. I came to know that while posting the form (i.e. when Save Configuration is clicked) the data sent was of large amount and the system was not able to accept since maximum input size was not defined. Following were the changes made in php.ini file.

; How many GET/POST/COOKIE input variables may be accepted
max_input_vars = 2048

After making above changes I restarted the Apache server. Thus, the problem was resolved and Save Configuration in Menu started working.

[dfads params=’groups=-1′]

How to take backup and restore openvz (Proxmox Virtual Environment)?

Well, I am not that sound in playing with the tools of openvz but through the assistance of professionals, I came to learn how to take backup of openvz and restore it in another proxmox virtual environment. In order to understand this tutorial, you must have a little knowledge of Linux and its basic commands. The following steps more or less clearifies the process:

[dfads params=’groups=-1′]


  1. Login to your proxmox via root.
  2. Check whether there is sufficient space to take backup. Use the command below to check the available space on the system:

    moon:~# df -h

    Filesystem Size Used Avail Use% Mounted on

    /dev/mapper/pve-root 95G 15G 76G 16% /

    tmpfs 16G 0 16G 0% /lib/init/rw

    udev 10M 632K 9.4M 7% /dev

    tmpfs 16G 0 16G 0% /dev/shm

    /dev/mapper/pve-data 723G 272G 452G 38% /var/lib/vz

    /dev/sda1 504M 44M 435M 10% /boot

  3. In order to list out the virtual machines type the following command:

    moon:~# vzlist

    CTID NPROC STATUS IP_ADDR HOSTNAME

    101 67 running 10.10.10.110 hindi-website.example.com

    103 206 running 10.10.10.251 maincopy.example.com

    201 92 running 10.10.10.106 engsecondary.example.com

    240 64 running 10.10.10.108 wsdb-backup.example.com

    242 78 running 10.10.10.107 hi-secondary.example.com

    410 109 running 10.10.10.104 rc.example.com

  4. Note down the CTID for which you are taking the backup. CTID is an identifier which uniquily represents the respective virtual machine.
  5. Follow the command below to take the backup of the virtual machine:

    moon:~# sudo vzdump –dumpdir /var/lib/vz/dump/ 103 –suspend –compress

The above command takes a complete backup of the virtual machine whose CTID is 103 at the location /var/lib/vz/dump/. The backup process will take approximately an hour to complete. In order to confirm the successfull backup change the directory to /var/lib/vz/dump/ and execute the command ls or dir. Two files are generated prefixed by vzdump-openvz-*.

  1. Copy the backup to another proxmox using the following command:

    moon:~# scp vzdump-openvz-103-2014_06_24-17_22_53.tgz root@10.10.10.44:/var/lib/vz/dump/

  2. In order to restore, first of all login to your proxmox via GUI.
  3. Delete the virtual machine if there is insufficient space or make some space to restore the backup.
  4. Now, Login to your proxmox using ssh or putty. Change your directory to /var/lib/vz/dump/ (location of the backup) . Execute the following command:

    earth:~# vzrestore vzdump-openvz-103-2014_06_24-17_22_53.tgz 103

The above command will restore the backup creating a complete new virtual machine. It takes approximately an hour to complete the process.

  1. Login to your proxmox via GUI. A new virtual machine will be visible. Before starting the machine modify the IP Address in order to prevent the IP conflict.
  2. If the macnine contains MySQL binded with the IP then modify the IP from the file /etc/mysql/my.conf

[dfads params=’groups=-1′]

How To scp, ssh and rsync without prompting for password

Following steps would help you to do scp, ssh & rsync without prompting for password:

1. On Host A where you run scp/ssh/rsync command, run the following command: 

$ ssh-keygen -t rsa

This will prompt a passphrase. After pressing enter key it’ll generate a private and a public key. Public key is saved at ~/.ssh/ by default.

2. Transfer id_rsa.pub file to Host B using scp or ftp.

[dfads params=’groups=-1′]

3. On Host B, login as remote user and copy the contents of id_rsa.pub to ~/.ssh/authorized_keys using the following command:

$ cat id_rsa.pub >>~/.ssh/authorized_keys
$ chmod 700 ~/.ssh/authorized_keys

4. Thats’ all, Now you can run scp, ssh and rsync command without prompting for password.

5. Note that ssh by default does not allow root to log in. This has to be explicitly enabled on Host B. This can be done by editing /etc/ssh/sshd_config and changing the option of PermitRootLoginfrom no to yes. Don’t forget to restart sshd so that it reads the modified config file. Do this only if you want to use the root login.

[dfads params=’groups=-1′]

Starting web server: apache2(98)Address already in use: make_sock: could not bind to address 0.0.0.0:80

download

$service apache2 restart
[....] Starting web server: apache2(98)Address already in use: make_sock: could not bind to address 0.0.0.0:80
no listening sockets available, shutting down
Unable to open logs
failed!

In order to solve the above issue, type following on your console

fuser -k -n tcp 80

[dfads params=’groups=-1′]

Http Error 0 in Drupal

[dfads params=’groups=-1′]

Http Error 0  is a very common error that occurs in Drupal. There are many reasons behind this error.

htttp-error-0

One of the way to resolve this error is to append the following line in this file : /etc/apache2/mods-available/fcgi.conf

[code]

MaxRequestLen 536870912

[/code]

Increase the number value of the MaxRequestLen until the error stops to continue.

[dfads params=’groups=-1′]